Quality Standard
Inspection standard
We use the well-proven and widely adopted international standard ANSI/ASQC Z1.4-2003 (equivalent to MIL-STD-105e, ISO2859, NF06-022, BS6001, DIN40080, and GB2828) to measure the acceptable quality level of the products we inspect.
How do I determine the right sample size and acceptance number?
For example, the order quantity is 12,000 and we select general inspection levels-II (see Table A) to be as the sampling method, then we can get sample size code letter L (see Table A). With this code letter, and if we take the single sampling plan for normal inspection, we can get the sample size: 315 from table B. It means that 315 samples can well represent this order. For an AQL of 0.15, the corresponding acceptance number is 1 and the rejection is 2.
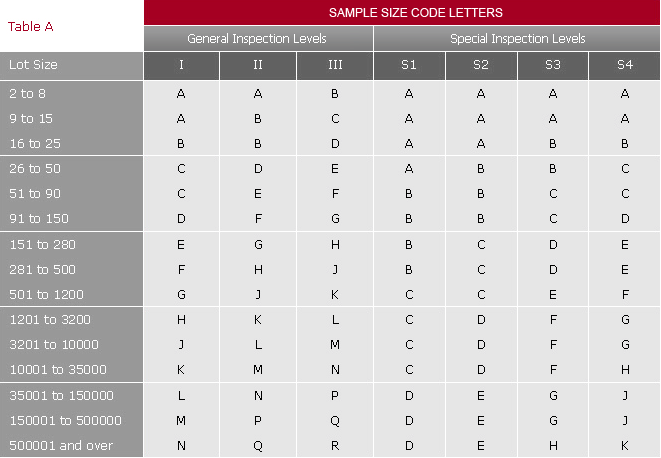
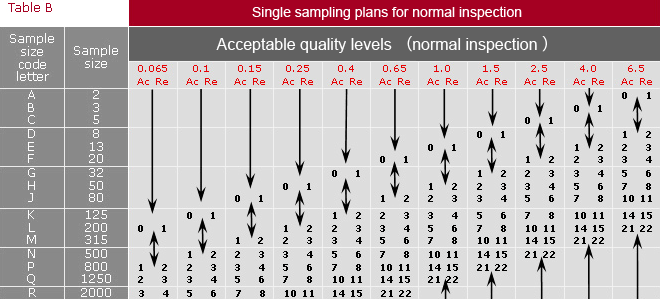
As default, we use general inspection level II, Single sampling plan, and the AQL of:
Critical: 0
Major: 2.5
Minor: 4.0
For example, if there's an order with 6,000 products, then according to CIS's default sampling technique, the sample size will be: 200 products. The maximum acceptable defect number will be:
Critical: 0 defective products
Major: 10 defective products
Minor: 14 defective products
Defect classification and definition
Otherwise specified by customers, CIS usually defines the defects as below:
Critical:
A Defect that is likely to result in unsafe conditions or contravene mandatory regulation. In our normal practice, no Critical Defect is accepted; any of this kind of defect found will be subjected to an automatic rejection of inspection result.
Major:
A Defect that would reduce the usability of the product, or that shows an obvious appearance defect that would affect the sales of the product.
Minor:
A Defect that does not reduce the usability of the product, but it is still beyond the defined quality standard and may influence the sale
We use the well-proven and widely adopted international standard ANSI/ASQC Z1.4-2003 (equivalent to MIL-STD-105e, ISO2859, NF06-022, BS6001, DIN40080, and GB2828) to measure the acceptable quality level of the products we inspect.
How do I determine the right sample size and acceptance number?
For example, the order quantity is 12,000 and we select general inspection levels-II (see Table A) to be as the sampling method, then we can get sample size code letter L (see Table A). With this code letter, and if we take the single sampling plan for normal inspection, we can get the sample size: 315 from table B. It means that 315 samples can well represent this order. For an AQL of 0.15, the corresponding acceptance number is 1 and the rejection is 2.


As default, we use general inspection level II, Single sampling plan, and the AQL of:
Critical: 0
Major: 2.5
Minor: 4.0
For example, if there's an order with 6,000 products, then according to CIS's default sampling technique, the sample size will be: 200 products. The maximum acceptable defect number will be:
Critical: 0 defective products
Major: 10 defective products
Minor: 14 defective products
Defect classification and definition
Otherwise specified by customers, CIS usually defines the defects as below:
Critical:
A Defect that is likely to result in unsafe conditions or contravene mandatory regulation. In our normal practice, no Critical Defect is accepted; any of this kind of defect found will be subjected to an automatic rejection of inspection result.
Major:
A Defect that would reduce the usability of the product, or that shows an obvious appearance defect that would affect the sales of the product.
Minor:
A Defect that does not reduce the usability of the product, but it is still beyond the defined quality standard and may influence the sale


